Alibaba Cloud
The information on this page has moved
For the most up-to-date Alibaba Cloud Setup content, see Onboard an Alibaba Cloud Account.
Legacy Content
🚧 New Onboarding Process for Connecting Cloud Accounts
The following content is for our legacy onboarding process for connecting a cloud account. Beginning with our 23.4.11 release InsightCloudSec includes a new onboarding workflow - documentation on that workflow is available on the new Alibaba Cloud Onboarding page.
If you are have issues or need support related to onboarding reach out to your CSA or contact us through the Customer Support Portalwith any questions.
Alibaba Cloud, is the largest cloud computing company in China. Headquartered in Singapore, Alibaba Cloud operates in 18 data center regions and 42 availability zones around the globe.
Prerequisites
Before you can complete this setup, you will need to ensure you have the following:
- An existing InsightCloudSec platform installation
- An existing Alibaba Cloud account with the appropriate access to grant InsightCloudSec access to your cloud account(s)
- Refer to the JSON RAM policy for details about permissions
Note: InsightCloudSec support of Alibaba Cloud is limited to read-only access.
This page walks through the following:
- Creating a custom policy
- Creating a user
- Saving the Access Key for your user
- Assigning your policy to your user
- Adding your cloud to InsightCloudSec
For questions or concerns reach out to us through the Customer Support Portal.
Setup in Alibaba Cloud
Create a Custom Policy
1. From the Alibaba Cloud console, go to the Resource Access Control page.
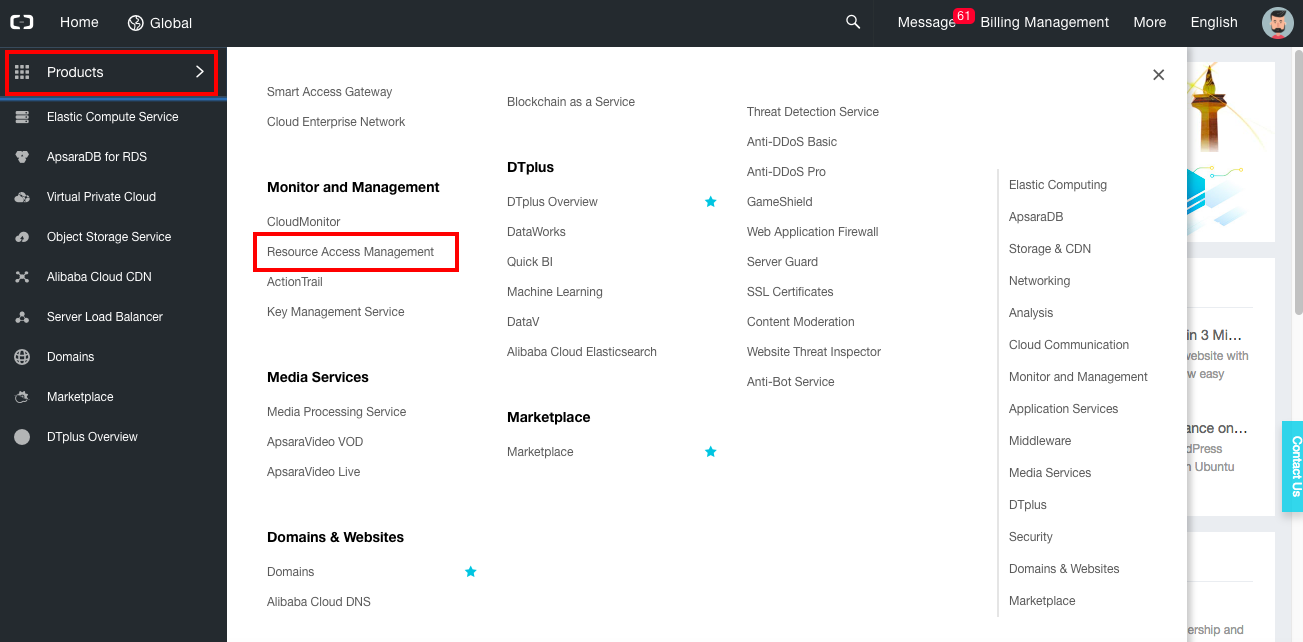
2. Select "Products" from the navigation menu.
3. Select "Resource Access Management" under the "Monitor and Management" group.
4. Create the RAM Policy as follows:
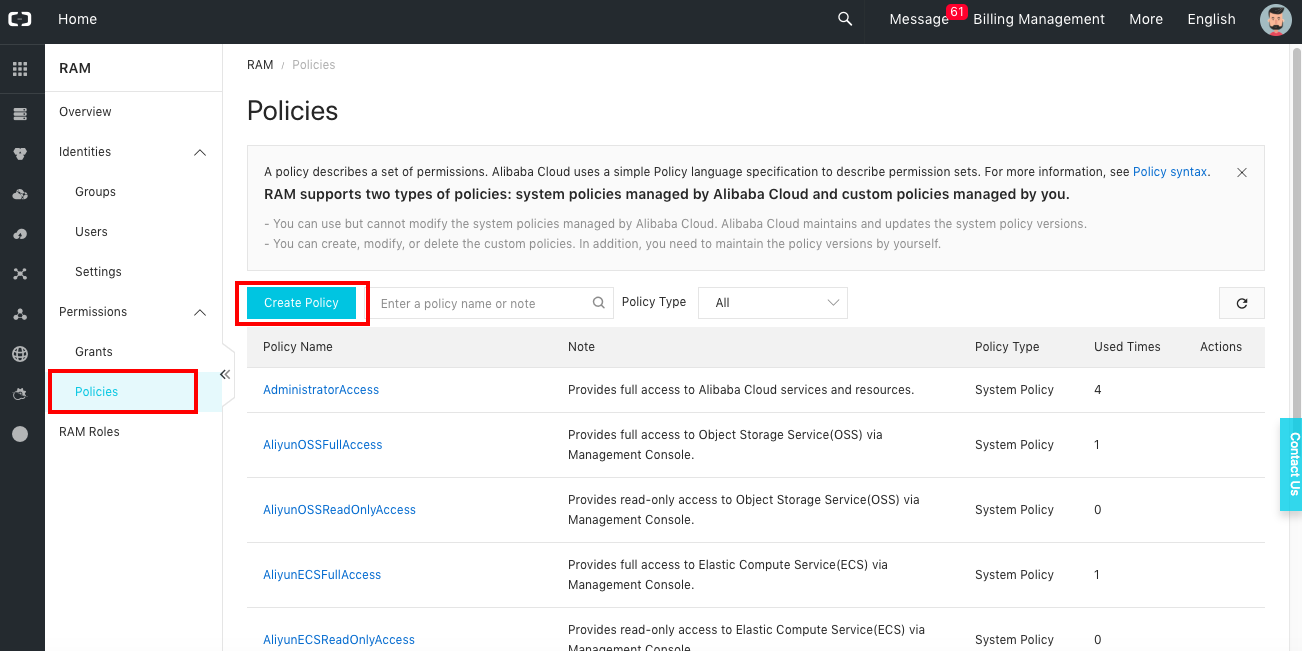
- Select "Policies" under "Permissions" on the RAM navigation menu.
- Select "Create Policy".
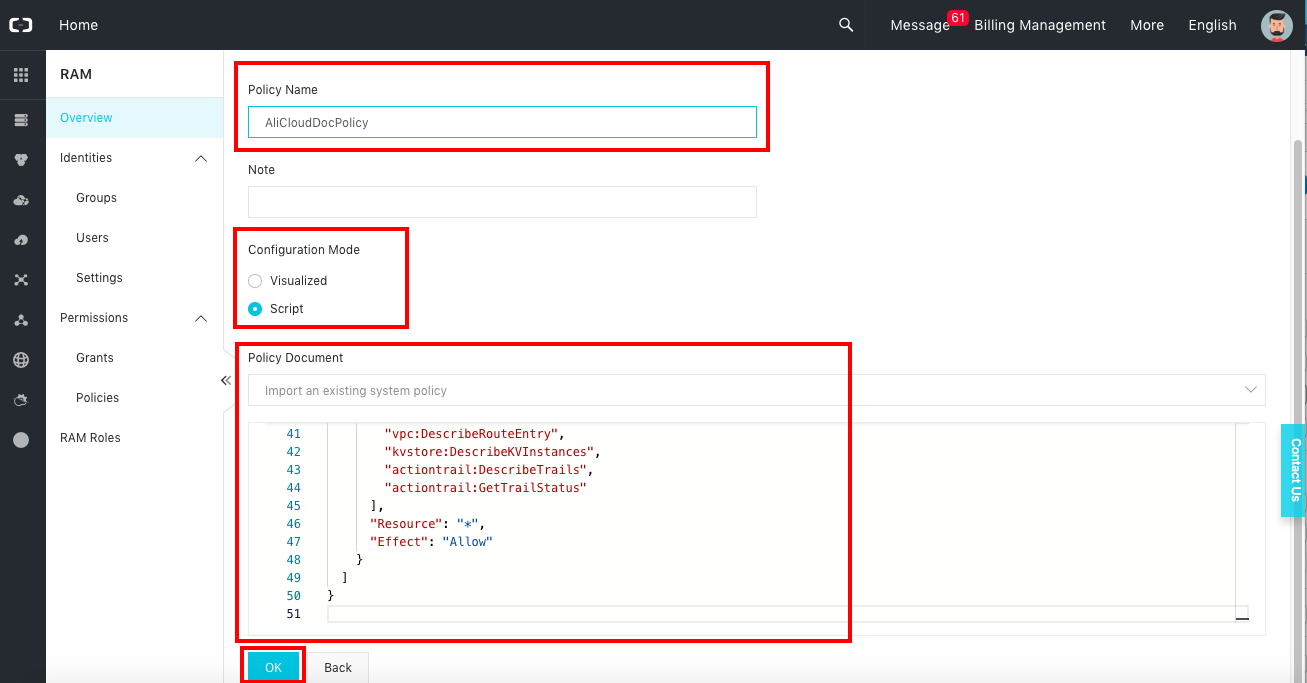
5. Give the policy a name. Note rules for special characters in the policy name e.g., spaces are not allowed.
- Add a note/description if desired.
- Select "Script" for the Configuration Mode.
- Copy the Read Only Resource Access Management (RAM) JSON policy from our public S3 bucket. The Read-Only policy contains only read permissions for the Alibaba Cloud resources that InsightCloudSec supports. Note: This policy will need to be updated any time InsightCloudSec supports a new Alibaba Cloud service.
6. Select "OK".
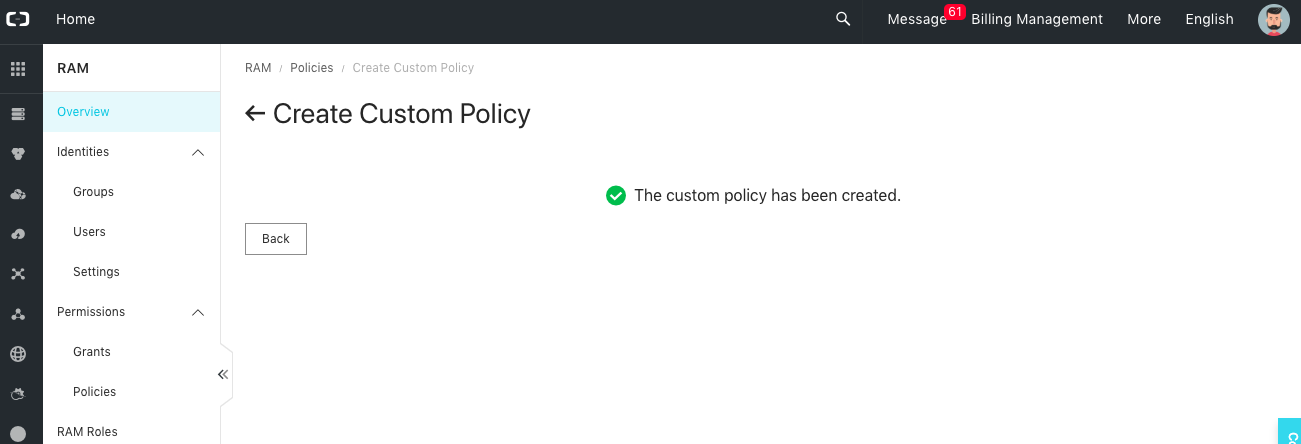
7. Confirm that your policy has been created. You should see a screen that looks like this:
Create a User
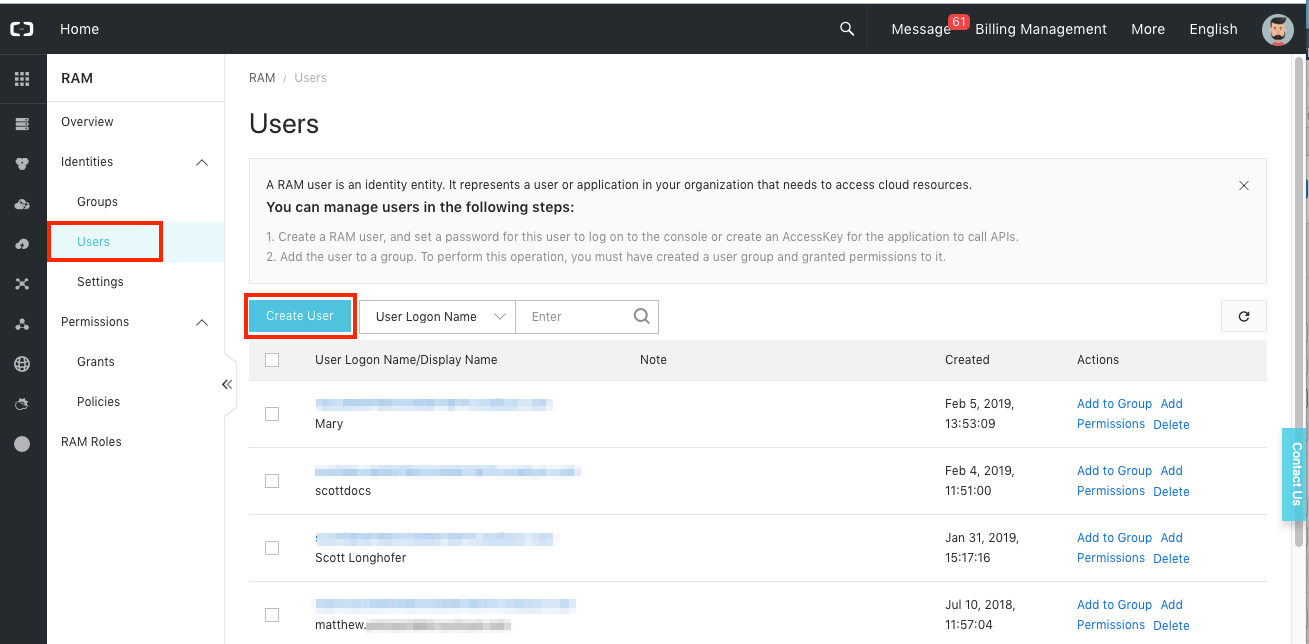
1. Select "Users" under the "Identity" section of the navigation menu; select "Create User".
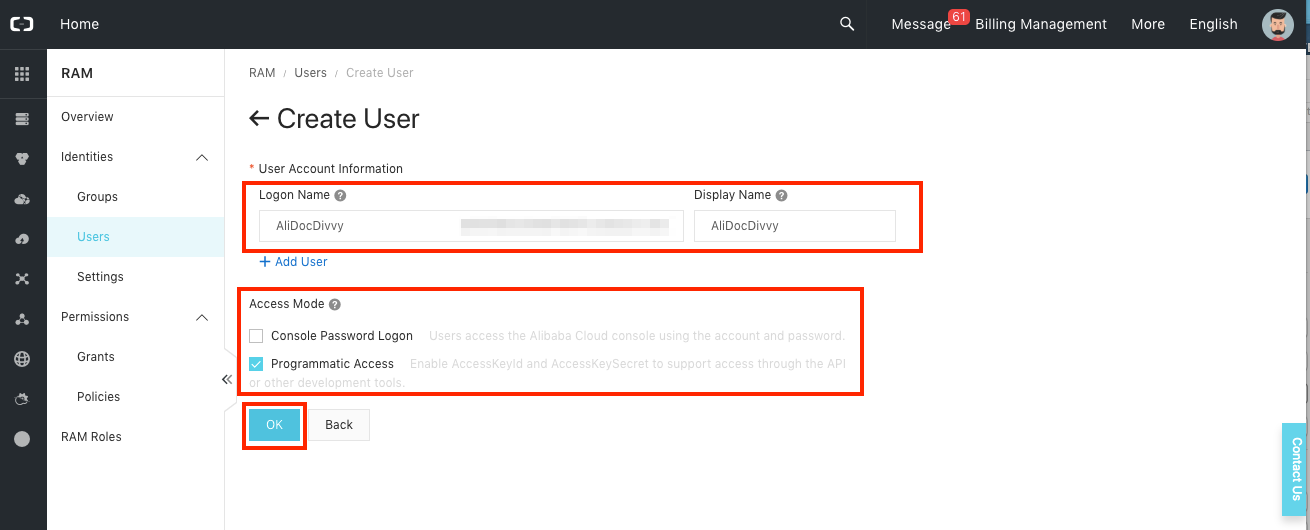
2. Select a login name. Note rules for special characters in the policy name e.g., spaces are not allowed. You may also select a display name, if you wish.
3. Select "Programmatic Access" for the Access Mode.
4. Select "OK".
Save the Access Key for Your User
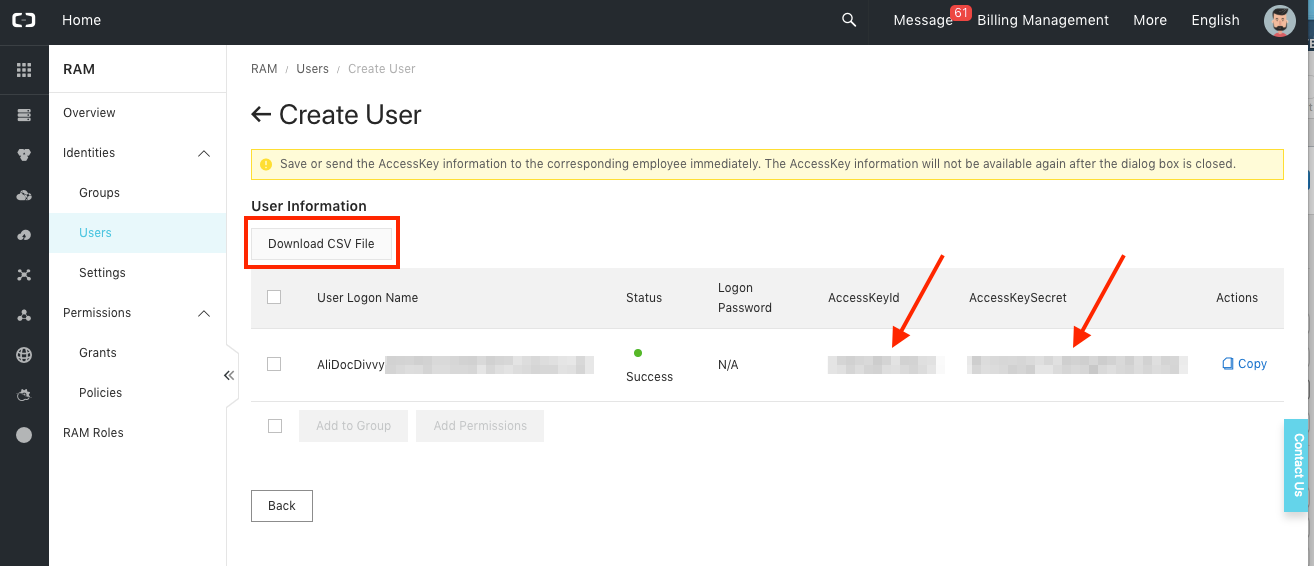
1. With a new user successfully created, a new User Information screen opens. This screen contains the Access Key ID and Access Key Secret.
❗️ Save the Information for the Access Key
Either download a csv file or copy to secure location the Access Key ID and the Access Key Secret.
Assign Your Policy to Your User
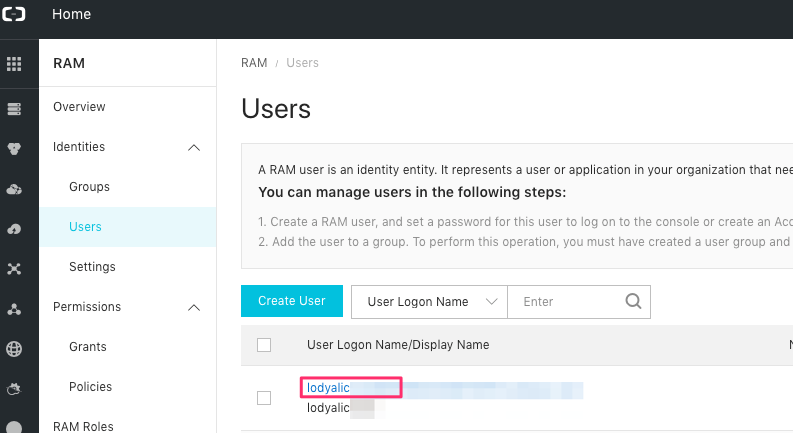
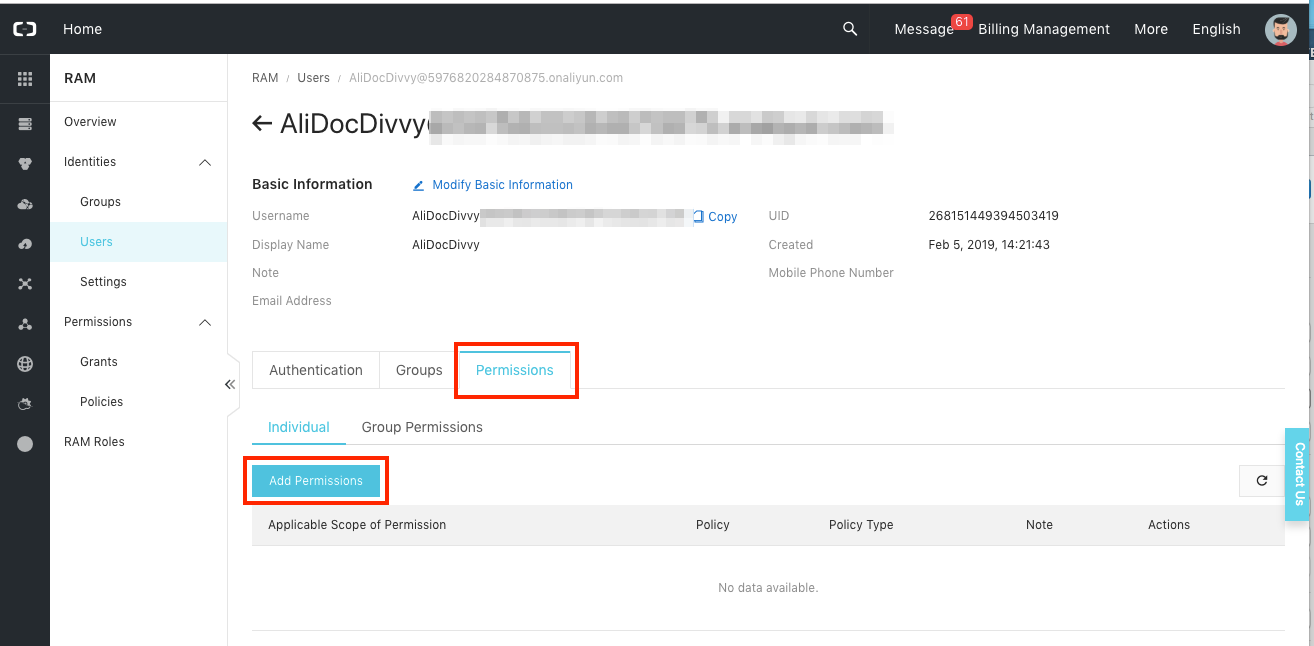
1. Once the user is created, go back to that user and click on it. Then select the "Permissions" tab under "Identities/Users" from the navigation menu; select "Add Permissions".
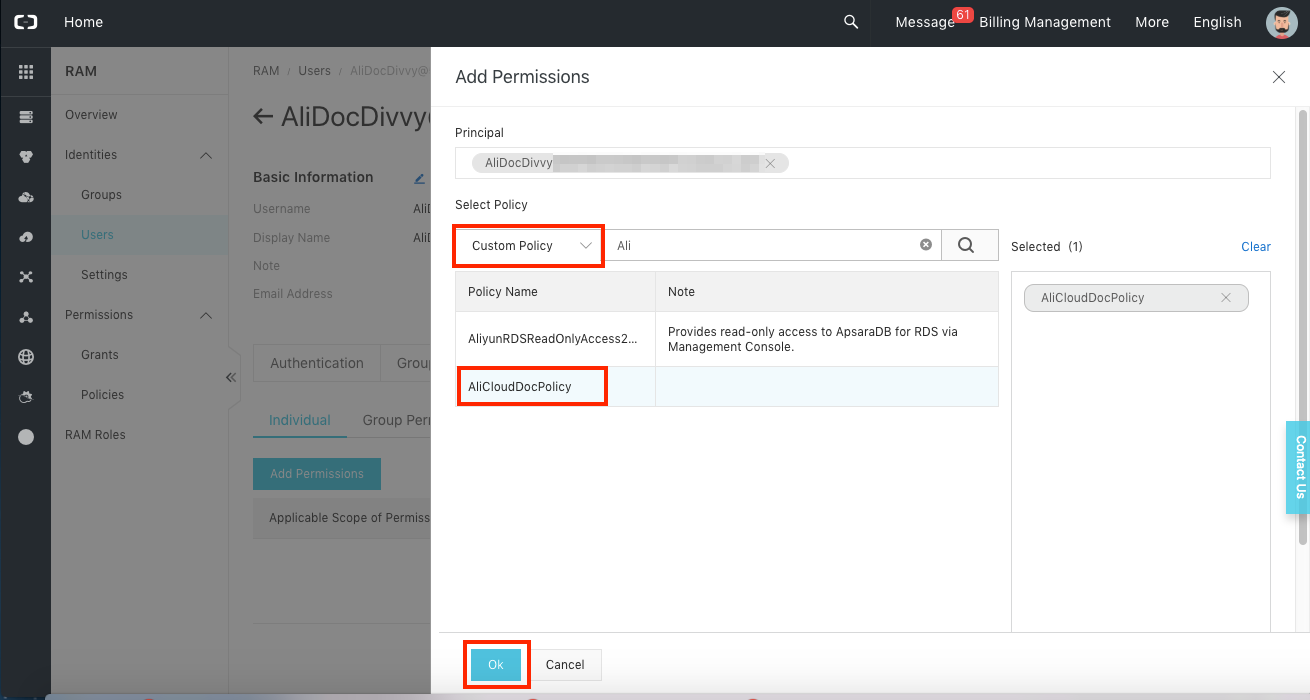
2. Select "Custom Policy" as the type of policy to add.
3. Select the name of the policy you created.
4. Select "OK".
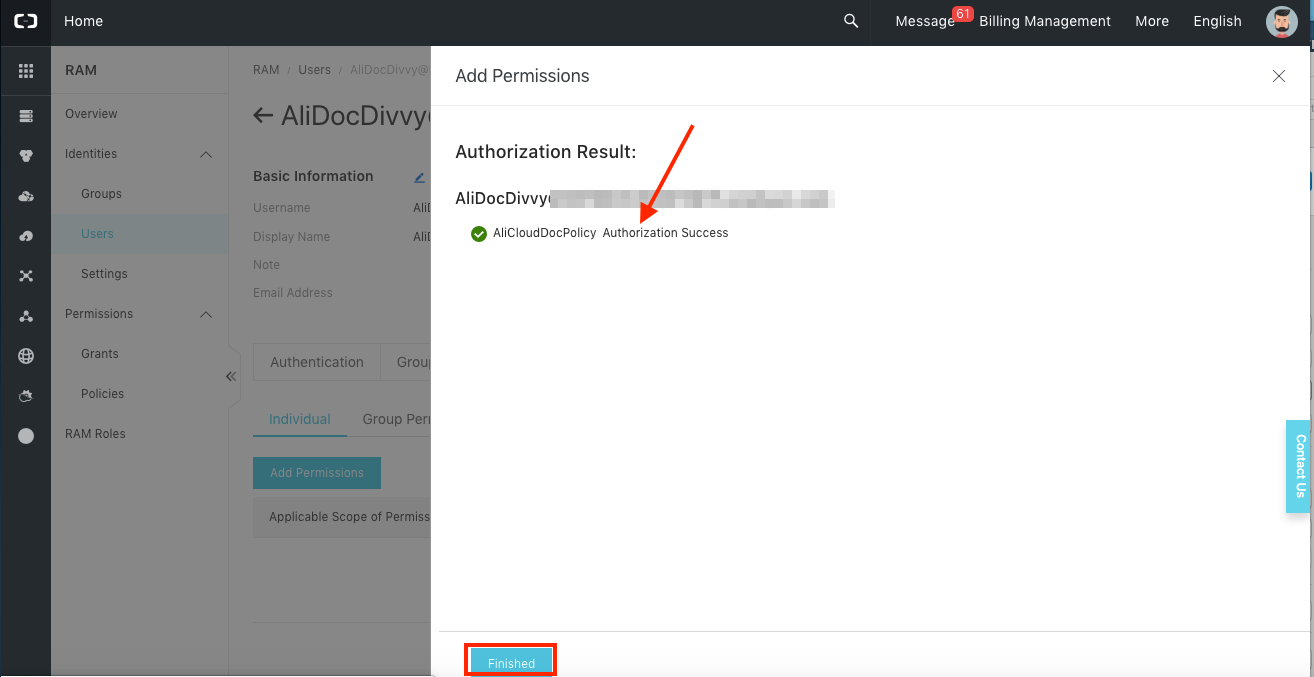
5. Confirm permissions have been authorized.
6. Select "Finished".
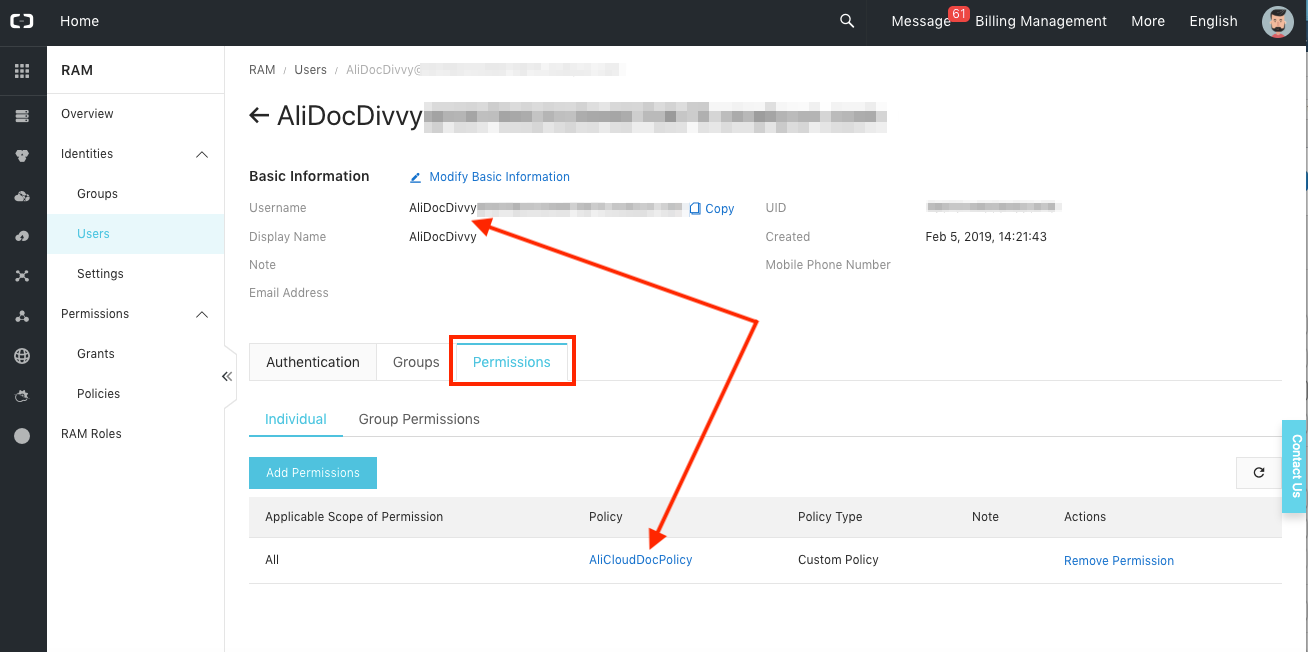
7. Confirm that the policy (permissions) have been added for this user.
Add Your Cloud to InsightCloudSec
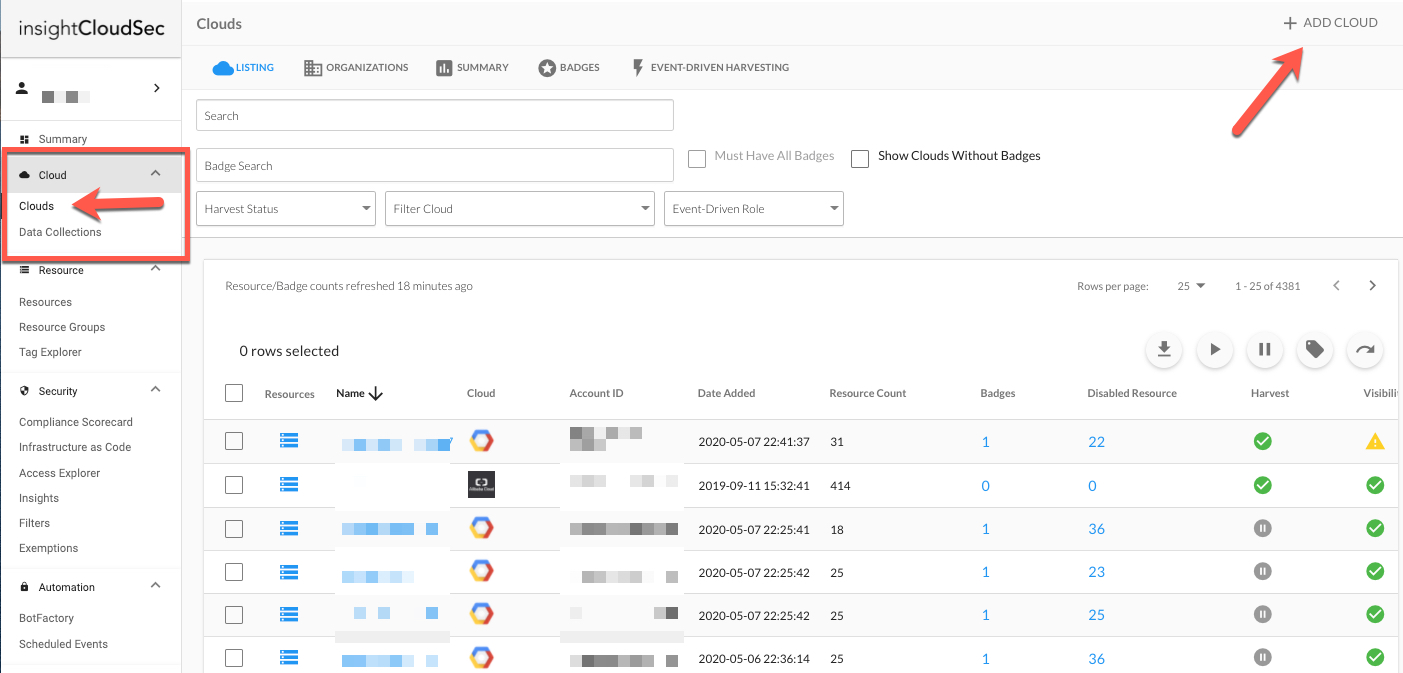
1. From your InsightCloudSec platform, locate "Cloud --> Clouds" on the main navigation menu.
2. Click on "Add Cloud" in the upper right.
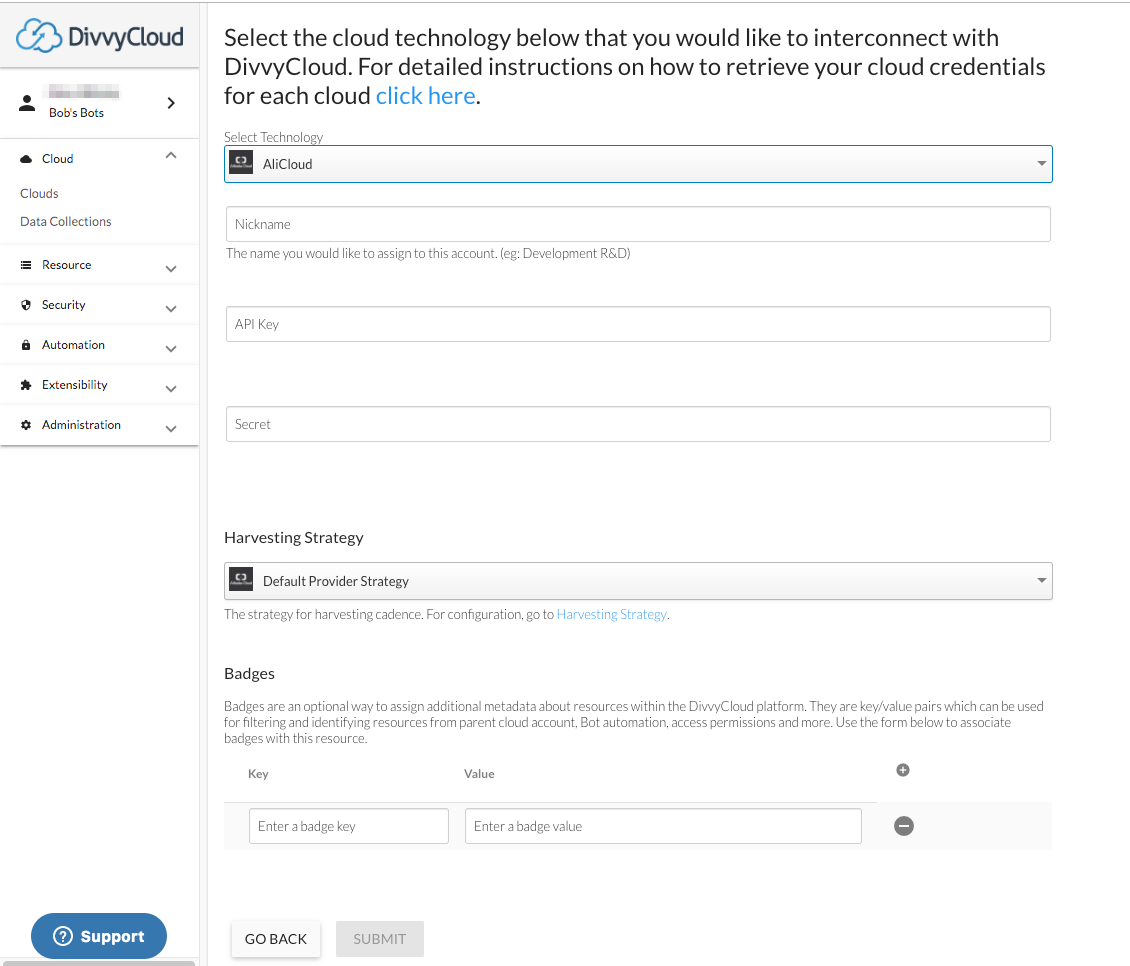
3. Select Alibaba Cloud and give your cloud account a name. (You may need to click "See More" to display Alibaba Cloud as an option)
4. Add the Access Key and Secret Key you saved in the earlier steps.
5. Select "Add Cloud".
6. Confirm the cloud account was successfully added by returning the the Clouds listing page.
